Iambic Explained
A dual-lever paddle sends dots on one side and dashes on the other — and when you squeeze both, the keyer alternates between them. How it behaves when you release a squeeze, and how readily it grabs the opposite lever, is what the Iambic mode and switchpoint settings decide. This page explains those modes, then shows how the Paddle Analyzer lets you see your own keying and adjust the settings.
The Keyer Modes
The paddle type is set on the Hardware Settings → Keyer tab, or changed live in the Paddle Analyzer. Four modes are available.
Iambic A vs. Iambic B
In both Iambic A and Iambic B, holding both paddles together sends alternating dots and dashes. If you release both paddles part-way through an element, Iambic A finishes that element and stops, while Iambic B can send the opposite element it has already queued. That queue is not limited to a squeeze: briefly tapping the opposite paddle while the current element is running can also queue the next element. The switchpoint and Pause Memory settings below decide when such a tap is captured.
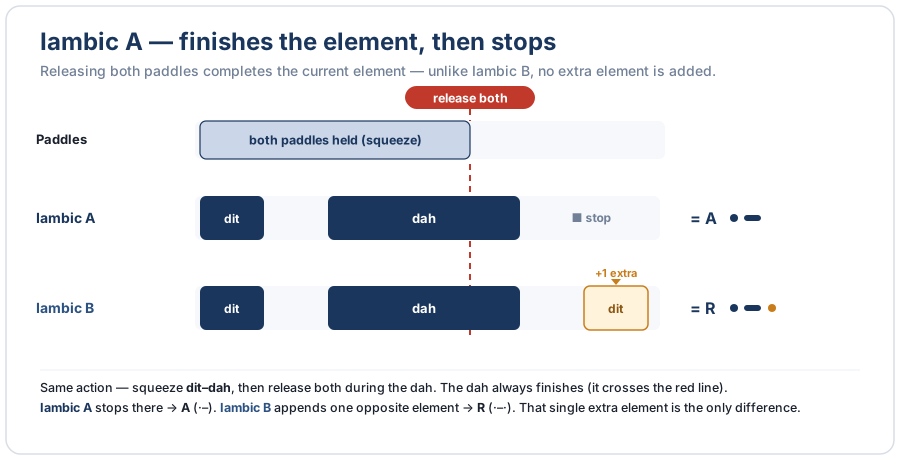
Iambic A vs. Iambic B — this diagram shows the release case, in which Iambic B adds the opposite element already queued
Switchpoint & Pause Memory
In Iambic B the keyer watches the opposite paddle while it sends an element, ready to queue that paddle as the next element. The switchpoint sets how far into the element the watching begins: a low switchpoint watches almost the whole element, so the opposite paddle is caught easily; a high switchpoint watches only near the end, so the opposite paddle is caught only if you hold it on. The paddle counts if it is still held anywhere from the switchpoint to the end of the element. Pause Memory extends that watching into the short gap after the element, so a deliberate tap made in the pause is still remembered. Dots and dashes have their own switchpoints (defaults 65% and 45%).
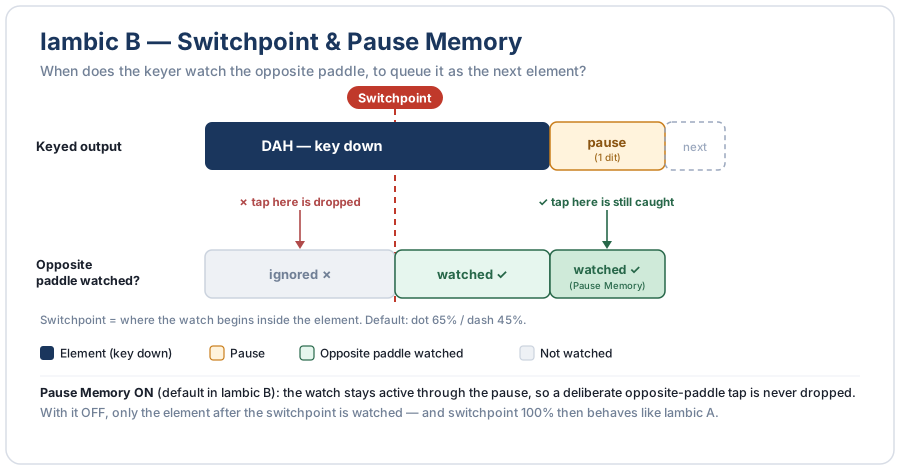
Switchpoint and Pause Memory — when the keyer watches the opposite paddle to queue it as the next element
Straight Key
In Straight Key mode the iambic keyer is bypassed entirely: the Box sends exactly what you key, with matching sidetone. Use it with a straight key, a bug, or an external keyer plugged into the paddle jack.
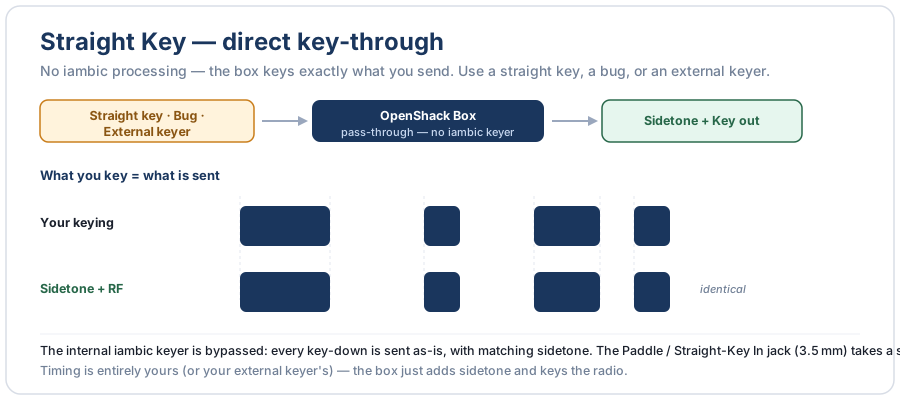
Straight Key — the iambic keyer is bypassed; you key a straight key, bug, or external keyer directly
Ultimatic
Ultimatic mode changes what a squeeze does: instead of alternating, the keyer repeats the element of the paddle you pressed most recently. Which paddle wins when both are held is set by the Ultimatic priority (Last, Dot, or Dash).
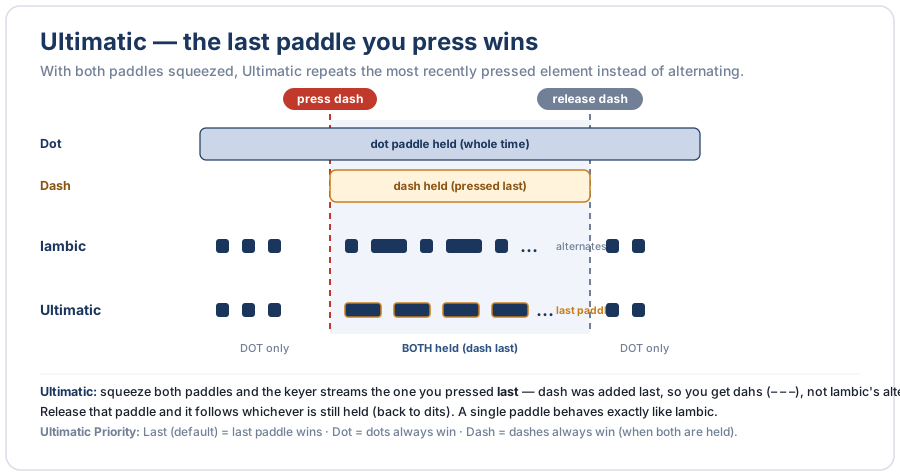
Ultimatic — with both paddles held, the last paddle pressed wins and its element repeats
Paddle Analyzer — Visual Switchpoint Tuning
The diagrams above show what Iambic A/B and the switchpoint do. The Paddle Analyzer in OpenShack shows you your own sending: it draws a live time line of what your paddle did next to the dots and dashes the keyer actually sent, so you can find the settings that fit your fist. Open it from Tools → Paddle Analyzer or Settings → Paddle Analyzer (the Box must be connected, with firmware 1.49 or newer — on older firmware the window says so and the time line stays empty; see Firmware Updates).
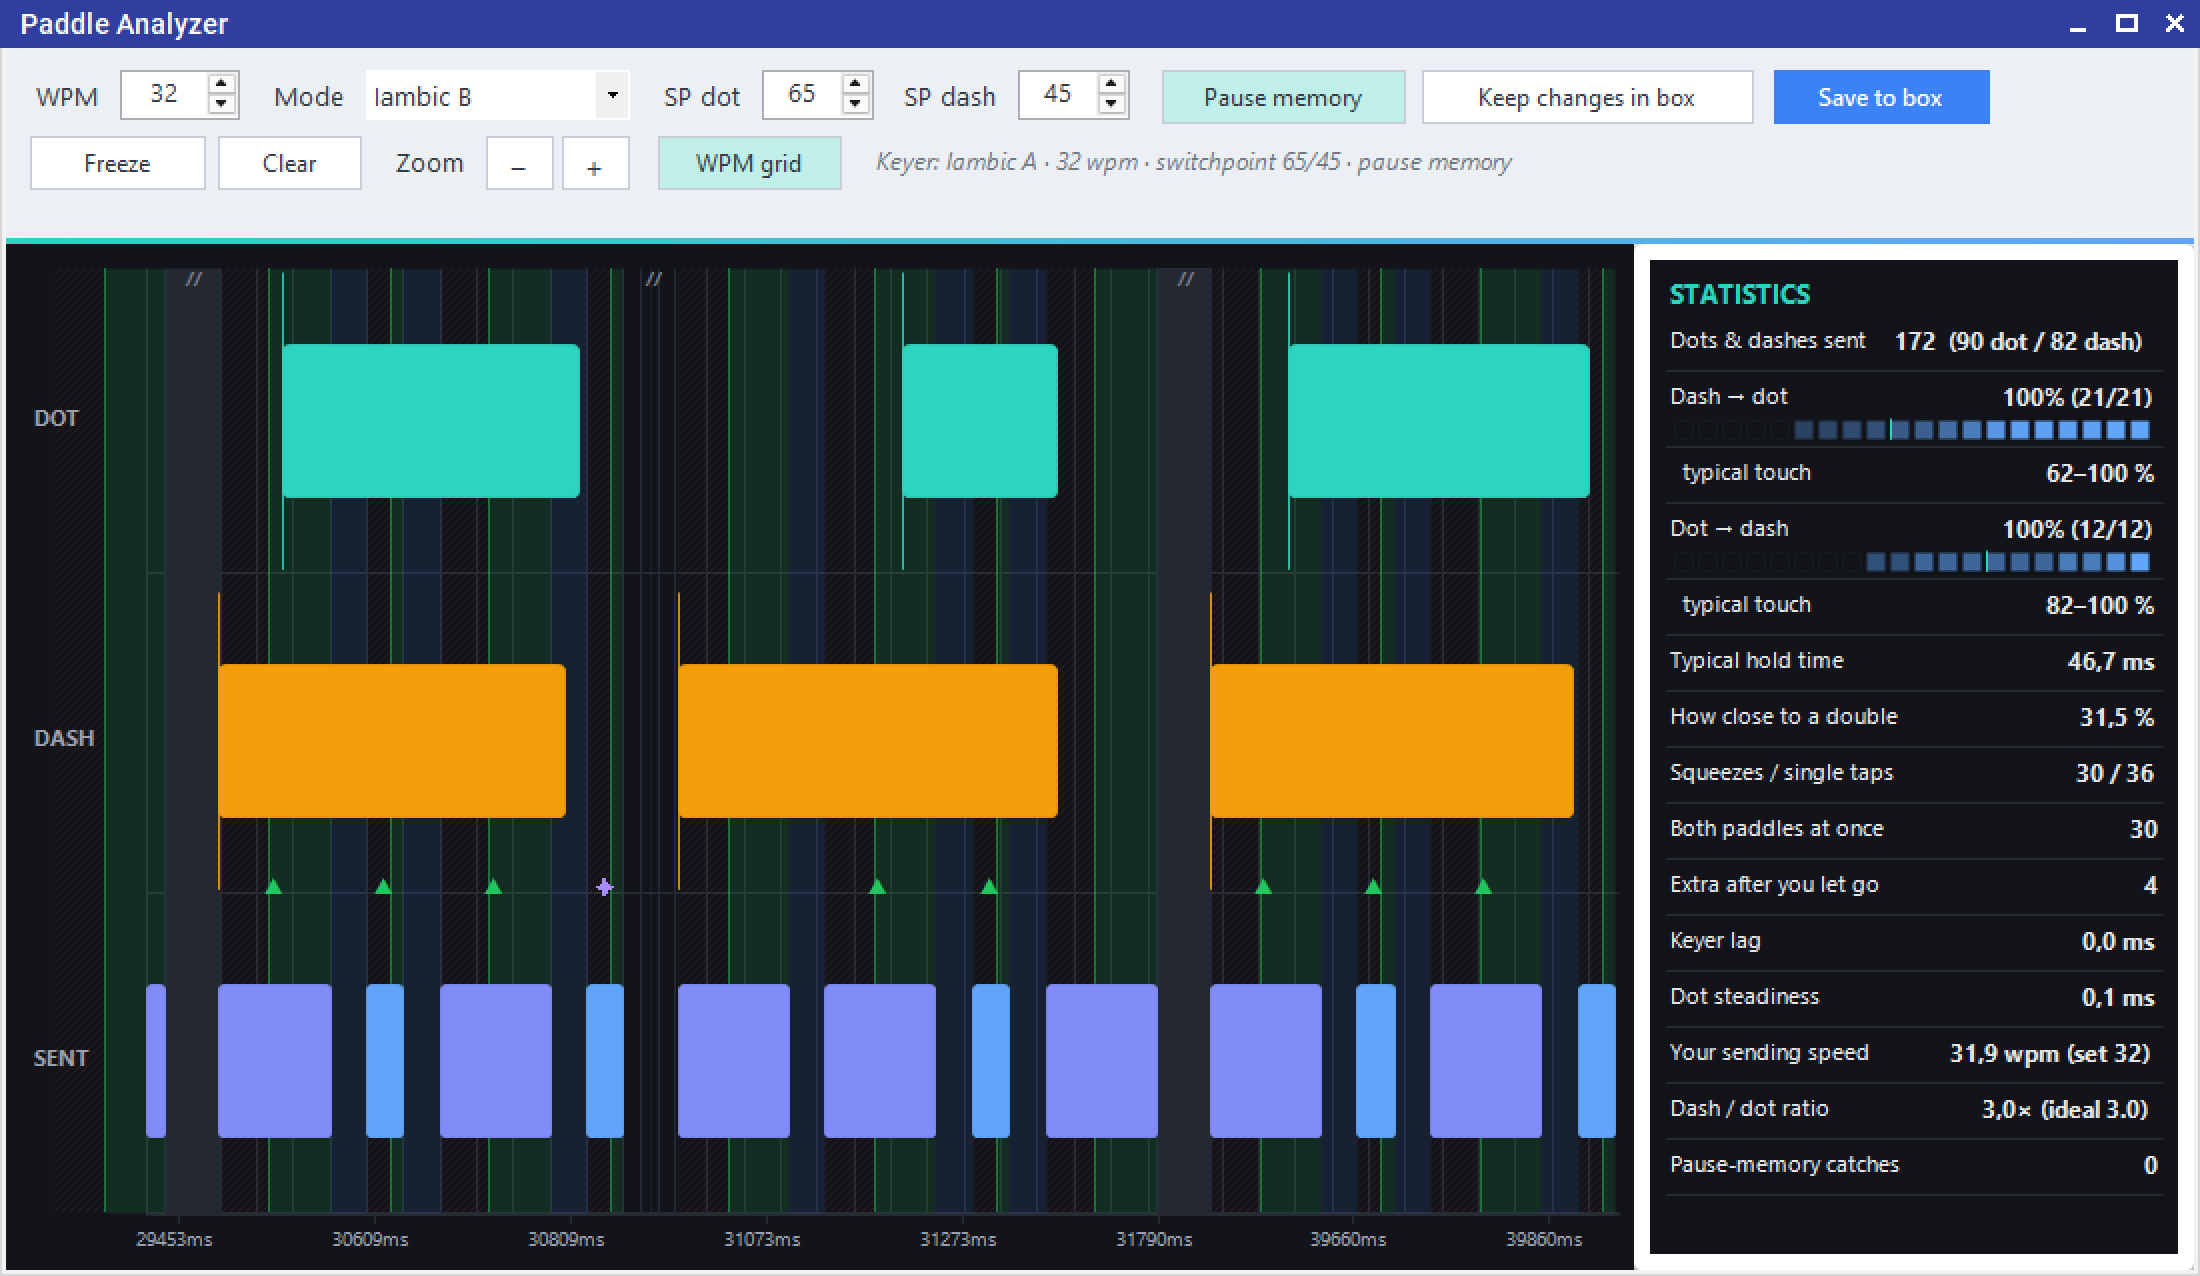
Paddle Analyzer — your dot and dash touches (upper lanes) lined up against the elements the keyer sent (lower lane); the keyer controls sit along the top
Reading the screen
The window is in three parts: a row of controls along the top, the time line filling the middle, and a statistics panel down the right. Time runs left to right; the newest keying is on the right and scrolls in as you send.
The time line has four stacked lanes, labelled at the left edge:
| Lane | Shows |
|---|---|
| DOT | Every moment your dot paddle was held down (teal bars). |
| DASH | Every moment your dash paddle was held down (amber bars). |
| SENT | The dots (short bars) and dashes (long bars) the keyer actually sent — its real output, not what you meant to send. |
| TEXT | The characters those dots and dashes spell, each one sitting over the elements that made it. |
Reading the two touch lanes against the SENT lane is the whole point: a touch with an element under it was used; a touch with nothing under it was a miss; an element with no touch above it is an extra the keyer added.
Switchpoint overlay (Iambic B). On each sent element the switchpoint is drawn as a vertical mark. The shaded green band from that mark to the end of the element is the capture window: if the opposite paddle is still held anywhere inside it, the keyer takes that paddle as the next element. The red-hatched band before the mark is the deadband: a touch that goes down and comes back up entirely inside it is ignored — but the same touch held on past the mark is caught. That is why it is the far end of your touch that decides a capture, not where it began.
Pause-memory band. With Pause Memory on, the short gap after each element is shaded too — the keyer keeps watching the opposite paddle there. When a tap in that gap actually decided the next element, the band is drawn brighter and carries a ◆.
The TEXT line. Along the bottom of the time line, every
character the keyer sent is spelled out under the elements that made it,
joined to them by a thin bracket. It reads the sent dots and
dashes, not what you meant — so when a squeeze puts in an extra element,
you see the letter it really became. The correction sign — a run of dots when
you break off a word — reads as <ERR>, and prosigns such as
<SK> or <CH> are spelled out too. A run
that spells nothing is shown as its dots and dashes in amber instead, and the
character you are keying right now stays dim until you pause long enough to
finish it. Word gaps are marked with /, the way CW is written
down.
Time axis and gaps. A time scale runs along the bottom at
round values (milliseconds, or seconds when zoomed out), counted from the
start of what is still on screen. A round value that is simply missing from
the row is another sign that a pause was shortened there. Your spacing between letters is
shown at its real length; anything longer — a gap between words, or a pause
for thought — is shortened to a fixed break, twice the width of a letter
gap, marked with a thin dashed //. So a break always looks like
a break, while your keying still stays packed together on screen instead of
drifting apart.
Point at anything to measure it. A thin marker follows your pointer, and a small readout tells you how long whatever is under it lasted — in milliseconds and in dot lengths at your current speed, which is the number that says whether the timing is right. It answers for the lane you are pointing at: a paddle touch or the gap between two touches in the DOT and DASH lanes, a sent dot or dash — or the silence between two of them — in the SENT lane. Point at the time row along the bottom instead and it tells you where the marker is, in milliseconds.
Straight key
Switch the mode to Straight and the analyzer follows your hand instead of the keyer. The display narrows to two lanes — KEY (your key, up and down) over SENT — plus the text line, and everything is timed from your own dots, not the WPM setting: key at whatever speed feels right and the text line still reads correctly. The statistics switch to what a straight-key fist actually tunes: dot steadiness, the gaps inside letters (textbook is 1 dot length) and between letters (textbook is 3), your real sending speed, and the dash-to-dot ratio.
Outcome markers
Above the SENT lane, an element can carry a small symbol saying how it came to be — read straight from the keyer's real output, not guessed. Any of these can appear at any time, depending on how you keyed:
| Marker | Means |
|---|---|
| ▲ green — captured | The opposite paddle was still held inside this element's capture window, so the keyer followed with it — a clean Iambic B squeeze. |
| ◆ sky blue — pause-memory catch | You tapped the opposite paddle in the gap after the previous element and let go before this one began; only Pause Memory caught it. |
| ✦ violet — trailing | The keyer added this element after you had released both paddles — the Iambic B tail. Don't want it? Try Iambic A. |
| ○ amber — inserted | An element with no matching touch holding at its start — the keyer put in an element you didn't drive. |
A plain element with no symbol is an ordinary one you keyed directly. There is no symbol for a missed touch — a miss shows instead as a touch in the DOT or DASH lane with no element beneath it in SENT.
Moving around the time line
By default the time line runs live, scrolling so the newest keying stays at the right edge.
| To… | Do this |
|---|---|
| Jump anywhere | Use the scroll bar along the bottom: it covers the whole ten minutes, so click where you want to go, or grab the bar and drag. Drop it at the far right to run live again. |
| Look back a little | Drag the time line itself left or right. It freezes automatically. This moves with your hand, so for anything more than a few seconds use the scroll bar. |
| Freeze / run live | The Freeze button stops the time line; while stopped it reads Live — press it to jump back to now and resume scrolling. |
| Zoom in / out | Roll the mouse wheel over the time line to zoom around the pointer, or use the Zoom − / + buttons. |
| Start fresh | Clear empties the time line and the statistics and returns to the live view. Your keyer settings are left untouched. |
The Analyzer keeps about the last ten minutes of keying; older activity drops off the left. Everything here is on-screen only — nothing is recorded to a file.
The controls
The controls along the top change the keyer live on the Box — send again to hear the effect. Nothing is written to the Box's memory until you press Save to box.
| Control | What it does |
|---|---|
| WPM | Sending speed in words per minute. |
| Mode | Paddle mode: Iambic A, Iambic B, Ultimatic or Straight. |
| SP dot | Dot switchpoint — how far into a dot before the keyer grabs the dash paddle. Lower grabs it sooner. |
| SP dash | Dash switchpoint — how far into a dash before the keyer grabs the dot paddle. Lower grabs it sooner. |
| Pause memory | Let the keyer remember a tap you make in the gap between elements. |
| Keep changes in box | Autosave on/off. Off — the default while tuning — lets you try things freely; they're gone at the next power-up. On keeps every change through a power-off. |
| Save to box | Write the current settings to the keyer's memory now. |
The statistics
The panel on the right measures your keying against the keyer's output and updates as you send. It only shows data — it never tells you what to set; the reading is yours to interpret.
| Value | What it tells you | Helps set |
|---|---|---|
| Dots & dashes sent | How many elements you've sent, and the dot / dash split. | — |
| Dash → dot | On a dash, how often bringing in the dot paddle actually produced a dot — e.g. 89% (31/35). Each press counts once. Low means you release the dot paddle too early in the dash. A small coverage strip underneath shows where your touches land against the switchpoint mark. | SP dash |
| typical touch | The usual dot-paddle touch across the dash, as a range from where it goes down to where it comes up (e.g. 40–100 %). The far end, against the switchpoint, is what decides the catch. | SP dash |
| Dot → dash | The same the other way round: on a dot, how often the dash paddle produced a dash, plus its typical touch. | SP dot |
| Typical hold time | How long you usually hold the paddle for a single dot or dash. | speed / feel |
| How close to a double | How close your hold comes to squeezing out a second, unwanted element. 100% would send a double; lower gives more slack. | speed / feel |
| Squeezes / single taps | How many of your moves were squeezes (both paddles) versus single taps. | paddle mode |
| Both paddles at once | How many times both paddles were pressed together. | paddle mode |
| Extra after you let go | Elements the keyer added after you released both paddles — the Iambic B tail. | Iambic A vs B |
| Dot steadiness | How much your dot lengths wander. Smaller is a steadier fist. | speed |
| Your sending speed | How fast your own fist is really going, next to the set speed. | speed |
| Dash / dot ratio | How long a dash is compared with a dot. 3 to 1 is standard. | speed / weight |
| Pause-memory catches | How many taps only Pause Memory saved — you had let go before the next element began. These are the ◆ marks. Switch Pause Memory off and they turn into dropped elements. | pause memory |
Decoded text. Below the statistics, everything you sent collects as text, newest at the bottom. Click any character to jump the time line to the moment you keyed it — handy when a letter came out wrong and you want to see the touches that made it. Clicking the newest character brings the time line back to now and it runs live again.
- Key a text you know well and listen. Are elements missing, or is the keyer adding extra ones you didn't mean to send? The timeline shows the same thing: a paddle touch with no element beneath it is a miss; an element with no touch above it is an extra.
- Elements missing? The keyer isn't catching your squeeze. If you are on Iambic A, switch to Iambic B. If you are already on B, lower the switchpoints so the keyer begins watching the opposite paddle earlier in the element.
- Extra, unwanted elements? The keyer is catching squeezes you didn't intend. Switch to Iambic A, or on B raise the switchpoints so the opposite paddle only counts when you hold it right to the end. Turning Pause Memory off is another way to cut extras — it stops the keyer remembering a tap you make in the gap after an element.
- Change one thing, key again, and watch the sent lane until it matches what you meant to send.
- Click Save to Box to keep the settings after a power-off.