CW Link — remote CW keying for real station setups
CW Link is the OpenShack window for remote CW keying. It covers the practical ways to put a key on one side of the network and a radio on the other: Box to Box, PC to Box, PC to FlexRadio, logger to remote station, or local Flex keying. Choose the role that matches the hardware in front of you; CW Link carries CW and PTT with low latency, local sidetone where possible, and buffering for real network jitter.
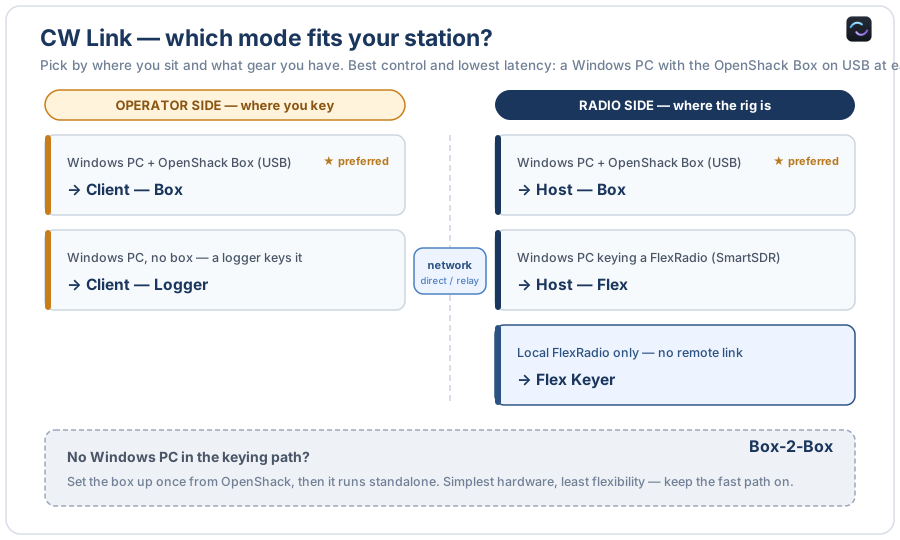
Start with the computer or Box in front of you
What CW Link Does
CW Link connects two stations and relays CW keying and PTT between them — nothing else. Audio and rig control (CAT) are separate; keep using whatever you already use for those (the Remote Station, a direct link, SmartLink, and so on). CW Link is built for the keying path and does that one job very well.
Every setup has two roles: the Host is at the radio and keys the transmitter; the Client is with the operator and sends CW and PTT. You configure the end in front of you, then tell a Windows Client which Host it should use: a standalone Host Box, Windows + Box, or Windows + FlexRadio. All choices share one compatible link protocol.
Choosing Your Setup
Under What do you want to set up?, choose Operator computer, Computer at the radio, or Standalone OpenShack Box. The next line asks what that computer or Box will do.
Network Host → USB Box
A Windows Host at the radio drives an OpenShack Box over USB. A Client connects from the operator side.
Host PC + USB Box →Network Host → FlexRadio
A Windows Host at the radio keys a FlexRadio over the local network. A remote Client connects.
Host PC + FlexRadio →USB Box → FlexRadio
Your local box keys a networked FlexRadio. No remote link — just you and the radio.
Local Box + FlexRadio →Network Host → Elecraft K4
A Windows Host at the radio keys an Elecraft K4 through the radio's network remote. A remote Client connects.
Host PC + Elecraft K4 →USB Box → Elecraft K4
Your local box keys a networked Elecraft K4. No remote link — just you and the radio.
Local Box + Elecraft K4 →Client with Box
The Client PC takes paddle CW — and, if you like, your logger's CW — from a local Box and sends it to the selected Host.
Client with USB Box →Client without Box
No Box — the logger (N1MM+, Win-Test…) keys the software keyer and the Client PC sends it to the Host.
Client with logger →Standalone Box: Host or Client
Configure an attached Box as a standalone Host or Client — with another Box or CW Link on Windows at the other end.
Standalone Host / Client setup →The Modes in Detail
Network Host → USB Box: the Box keys the radio

This is the Host at the radio: an OpenShack Box is wired to the rig's key line. A remote CW Link Client connects, and the Box replays its keying and PTT onto the radio. The box's own buffer starts at the floor you set and then adjusts itself to the connection — tightening on a clean link, loosening on a rough one — so the far operator's rhythm comes through faithfully. Connect the box in Hardware Settings first and keep its key output wired to the rig.
Network Host → FlexRadio

Same idea, but the radio is a FlexRadio and there is no box at your end — OpenShack keys the Flex directly through the SmartSDR API. A remote client dials in (a box, a box + PC, or a logger), and their keying goes on the air. One SmartSDR or Maestro station must be set up to transmit, and the keyed slice should be in a CW mode (CWL/CWU).
USB Box → FlexRadio (local box keys a networked Flex)

This is the classic Flex Keyer from earlier versions, now a CW Link mode. Your local OpenShack Box keys a FlexRadio over your own network (LAN or VPN) — there is no remote link and no shared password, because both the box and the radio are yours. Your paddle, straight key, or memories key the radio, while the box's own sidetone stays your zero-latency monitor. A footswitch or the on-screen PTT button puts the radio on the air for voice. Two extra buttons open a live decoder — to read back your own sending — and the memory keyer.
A logger can key here too: choose the OpenShack Winkey port on the Keying source tab and N1MM+, Win-Test and the like send through your box, exactly as described for the Client with Box.
Network Host → Elecraft K4

The FlexRadio host's twin for the Elecraft K4. OpenShack at the radio receives the remote operator's keying and passes it to the K4 through the radio's own network remote connection — no keying cable and no box at the station. On the K4, enable remote connections and set a remote password; then enter the radio's address, its remote port (normally 9205) and that password on the Elecraft K4 tab. Unlike the FlexRadio there is nothing to pick: the K4 is a single radio, so the remote Client needs no special setting.
USB Box → Elecraft K4 (local box keys a networked K4)

Your local OpenShack Box keys an Elecraft K4 over your own network (LAN or VPN) — there is no remote link and no link password, because both the box and the radio are yours. Your paddle, straight key, or memories key the radio while the box's own sidetone stays your zero-latency monitor. With Use footswitch for voice PTT ticked, the footswitch puts the K4 on the air for voice. Enter the K4's address, remote port and remote password on the Elecraft K4 tab.
A logger can key here too: choose the OpenShack Winkey port on the Keying source tab and N1MM+, Win-Test and the like send through your box, exactly as described for the Client with Box.
Client with Box: OpenShack Box connected by USB

You are the operator, wherever you are, with an OpenShack Box on USB. Your paddle, straight key, and F-key memories are the keying source, and the box gives you an instant local sidetone with no network delay at all — so your sending feels exactly as it does at home, no matter how far away the radio is. At the station, use OpenShack software with a Box or a Standalone Box. This PC only carries the link. Connect the box in Hardware Settings first.
Want to key from your logger as well? Choose the OpenShack Winkey port on the Keying source tab. OpenShack then also opens that virtual COM port as a WinKeyer for N1MM+, Win-Test and the like, and passes the logger's text to your box, which keys it exactly like your paddle — with the box's own sidetone. If OpenShack Setup installed com0com, the port is already chosen and the tab names the port to select in the logger. Leave it at (none) if you only key by hand.
Client without Box: No Box – Winkey Emulator only (virtual COM)

No box at hand? Your logging program (N1MM+, Win-Test, and the like) keys a software keyer built into OpenShack on a virtual COM port, and this PC carries it to the radio. Open the Keying source tab. If OpenShack Setup installed com0com, OpenShack selects its port automatically and shows the exact port to choose in your logger. Otherwise, select the OpenShack Winkey port manually and configure its matching port in your logger. A local PC sidetone gives you a monitor as you send.
Standalone Box: Host or Client

Connect the Box you want to set up. Choose the Client role (At the remote operator) or the Host role (At the radio). The Client Box sends CW and PTT over the network. The Host Box waits for that connection and keys CW and PTT at the radio. On the Standalone Box tab, enter the connection, station address when needed, link password, and timing buffer. Then click Save to Box. A WiFi indicator next to the buttons shows whether the Box is on WiFi — the network link can only start when it is. If it shows a warning, set up WiFi in Hardware Settings first. The other end may be another standalone Box or CW Link on Windows. Two standalone Boxes are the classic Box-2-Box arrangement with no PC running in the keying path.
Choosing a Connection Mode
CW Link offers a mode for networks you manage yourself and a managed mode for restricted or mobile networks. Choose the mode that matches the environment shown on the Link tab.
Local or private networks
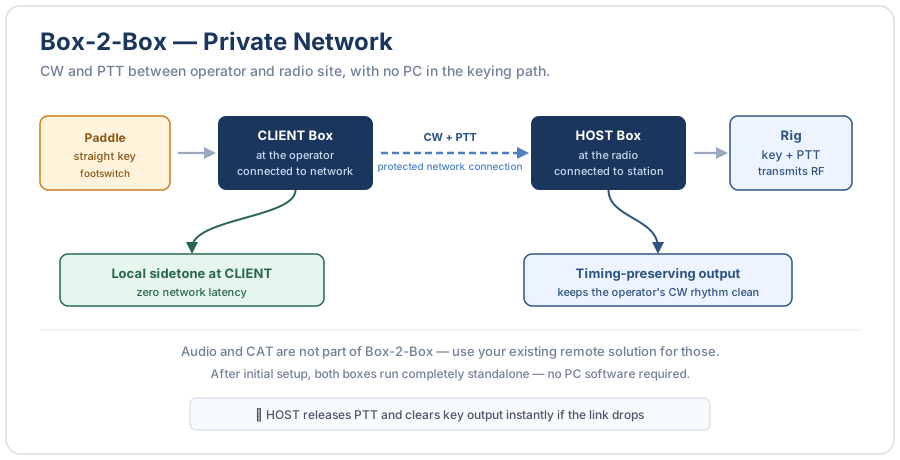
Use Direct on the same LAN, across a VPN, or where the radio-site host is intentionally reachable. The host lists the addresses you can use on the Link tab.
Restricted or mobile networks
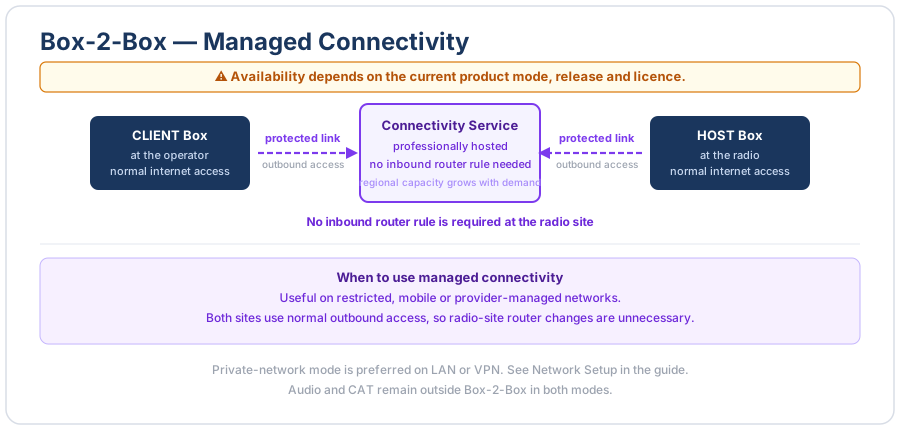
Use Relay where inbound router changes are unavailable or unwanted. Professionally operated infrastructure provides the connection path; both stations only need normal outbound internet access.
- Same network (LAN): use Direct with the host's local address. Nothing to set up.
- Private network or VPN: use Direct with the address provided by that network.
- Restricted or mobile internet: use Relay when you cannot provide inbound reachability at the radio site.
Ports, IPv4 and IPv6
CW Link uses one port for both TCP and UDP, 7373 by default. Both ends must use the same number; leave it at 7373 unless it clashes with something else. The host lists its reachable addresses on the Link tab, ready to copy.
- Local network (LAN): use the host's LAN address as-is. No router or firewall changes.
- IPv4 over the internet: forward TCP + UDP port 7373 on the host's router to the host PC, then hand out your public IP or DynDNS name. See Port Forwarding for the step-by-step.
-
IPv6 over the internet: give the operator the host's IPv6 address
in brackets, e.g.
[2003:e5:2711:9a10::7]:7373. There's usually no forwarding to do — just allow TCP + UDP 7373 through the firewall. See IPv6 and Stable IPv6 Address.
Connection Quality
CW Link preserves the timing of your keying while adapting playback to normal variation in network delivery. The defaults are suitable for most connections. On an unstable link, choose a more robust buffer profile or raise the buffer floor; on a very stable link, a lower setting can feel more immediate.
What the jitter buffer protects
Jitter means that network packets do not all take the same time to arrive. The radio-side Box does not use those uneven arrival times as CW timing. Instead, it waits for the configured JB delay and then reproduces the key-down and key-up durations sent by the operator-side Box. Normal variation that stays inside this cushion therefore does not turn a clean dit or dah into a distorted one.
This is protection for occasional transport spikes, not a substitute for a working connection. Repeated stalls or a delay beyond the remaining headroom can eventually skip elements. In that case, select a more robust profile, raise the buffer floor, and check the network path.
Link Password
Enter the same Link password at both ends. It must be at least 10 characters long. The local-only Flex Keyer mode needs no password because it does not create a remote link.
The Status Tab
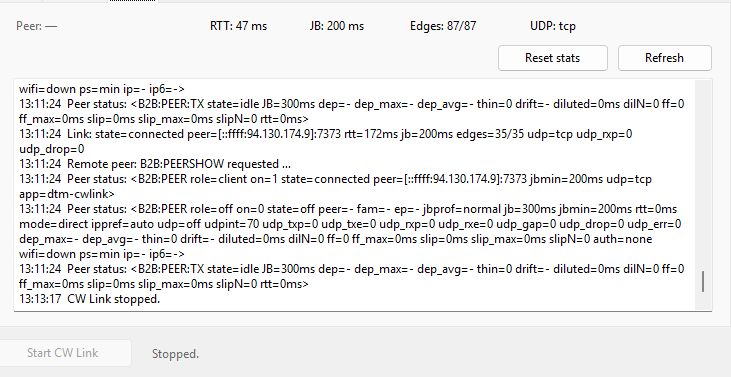
Once a link is running, the Status tab shows how the connection is performing:
The tab collects measurements and state from the components that are connected in the selected mode. Depending on the setup, those components can be Windows applications (the CW Link instances, the software keyer, or the Flex/API path) or OpenShack Boxes connected by USB or WiFi.
- Round trip — how long a signal takes to reach the other end and come back. Lower is better.
- Timing buffer — the buffer delay in use right now, in milliseconds.
- Keying events — a running count of keying changes carried over the link, a rough measure of activity.
- Network path — whether the link is using UDP or TCP.
Update status reads the latest numbers from both ends; Reset counters clears the counters so you can watch a fresh measurement window.
Box Diagnostics (Windows + Box at either end)
When a Box is part of the link, the status log can include additional diagnostic counters. These are primarily intended for support. If keying quality is poor, click Reset counters, key normally for a minute, click Update status, and include the resulting status text in your support request.
Sidetone — Where You Hear Yourself
A common surprise: with a remote link there are two separate places a sidetone can come from, and they're unrelated.
- At the operator (your) end — the OpenShack Box's own sidetone beeps the instant you key, with zero network delay. This is the sidetone to send by, and it's why paddle work over a remote link still feels natural. (In No Box – Winkey Emulator only it's the software keyer's PC sidetone instead.)
- At the radio (host) end — the rig makes its own sidetone when it transmits, depending on the radio model and its monitor settings.
Start into CW Link (Advanced Tab)
Normally you start OpenShack from its usual icon and open CW Link from the dashboard. If you run a fixed setup — an always-on station or a permanent operator console — you can instead create shortcuts that open CW Link and start the link automatically, reusing the connection, link password and settings from the last time you used it.
Open CW Link → Advanced. Under Automatic start you will find two checkboxes — tick the ones you want, untick to remove them again:
- Create a desktop shortcut — puts a OpenShack (CW Link) icon on the desktop for a one-click start straight into a running link.
- Start CW Link when I sign in to Windows — opens CW Link and starts the link after you sign in.
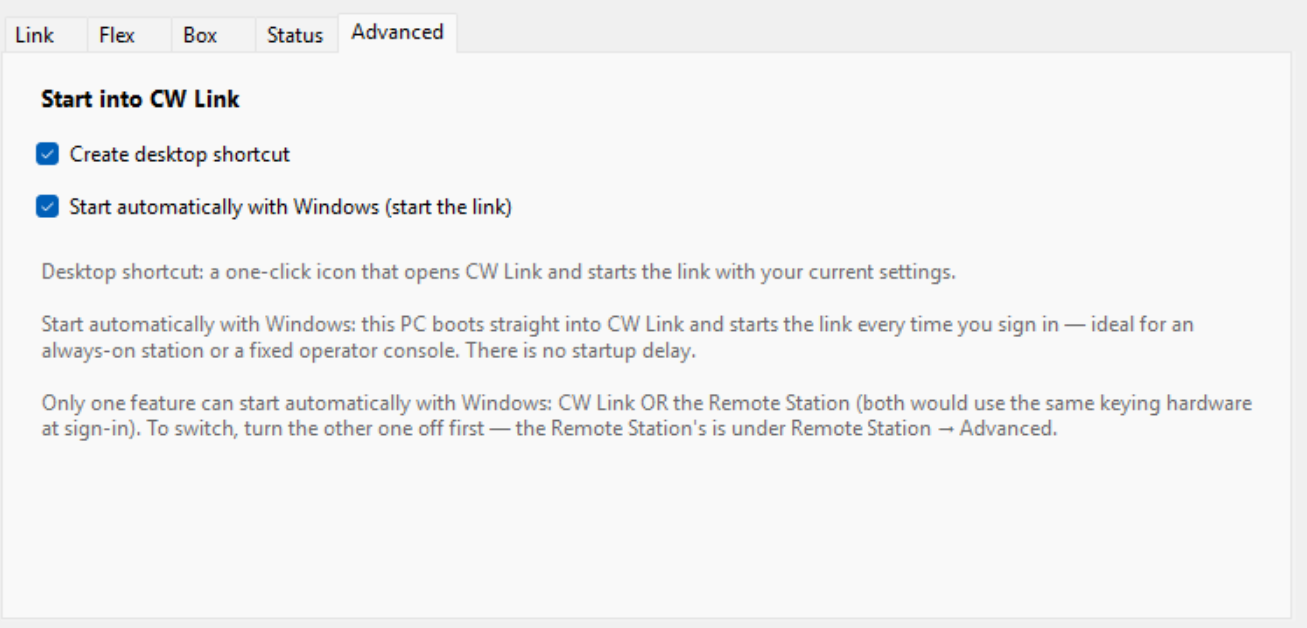
Advanced tab — the shortcuts for starting directly into CW Link (desktop and auto-start with Windows).
Set the connection, link password and the rest once; these shortcuts then reuse them every time. Hardware detection still runs first, so the Box is ready before the link starts. Unlike the Remote Station there is no startup delay — CW Link keys over the network rather than switching on gear that needs time to boot, so it starts straight away. (The Box-2-Box mode is configuration only, so an autostart just opens the window.) These shortcuts are optional — if you never tick a box, nothing extra is added, and you can remove either one at any time by unticking it here.
Tips & Troubleshooting
- One box, one window. CW Link shares the single OpenShack Box connection with the decoder and trainer windows, so it can't run at the same time as those or the Remote Station. Close the others first.
- Same password, same port, both ends. Most "won't connect" problems are a mismatched link password or port. Turn on Show to check the password.
- Edges climbing but no RF? The link is carrying keying changes, so check the host-side keying path: radio mode, key/PTT wiring or API connection, and whether the radio is actually enabled to transmit CW.
- Rough link? Raise the buffer floor a little and, on the box modes, try the Robust buffer profile. A steadier signal beats a snappier one that drops.
- Audio and CAT are elsewhere. CW Link is keying only. For rig control, waterfall and receive audio, use the Remote Station.